Tuesday, October 27, 2015

AVS Halloween Party

On Monday AVS had their annual Halloween party. Ellie and Kohlton had a different costume idea, but they are saving it for next year. They opted for a pretty comical set of costumes. Ethan and Ellie had unbelievable thrift store luck and found the perfect items to put together a sailor costume. He has been wanting the 13 button trousers for as long as he had been on the ship. He wanted me to make a pair, but time did come available. The kids went to the ARC and searched, not finding any, they were leaving that area of the store when another customer approached them saying, "Excuse me. I did not mean to listen to your conversation, but I think these are the pants you are looking for." And they are indeed perfect and brand new.

Monday, October 26, 2015

Halloween Preparations + Buttery Sourdough Buns Recipe

Halloween week is upon us and we have a lot of activities going on this week, including our annual pumpkin carving party and potluck. I had big plans for exciting decorations, but I did not get any out this weekend as I have a cold. Luckily, I put a few decorations out the previous weekend. Another thankful thing is that Ellie and Kohlton are excited to decorate. They picked up some fun stuff on Sunday and have it all laid out. They spent their evening making cheesecloth ghosts. I will be sure to share a photo or two once we are ready for the party.

----------
Buttery Sourdough Buns
via: King Arthur Flour

Dough
1/2 cup sourdough starter, fed or unfed
3 cups King Arthur Unbleached All-Purpose Flour
2 1/2 teaspoons instant yeast
1 tablespoon sugar
1 1/4 teaspoons salt
1 large egg
5 tablespoons soft butter
2/3 cup lukewarm water

Topping
4 tablespoons melted butter, divided
1/4 teaspoon paprika, optional

1) Combine all of the dough ingredients in a large bowl, and mix and knead — using your hands, a stand mixer, or a bread machine set on the dough cycle — to make a soft, smooth dough.

2) Place the dough in a lightly greased container — an 8-cup measure works well here — and allow the dough to rise for 1 1/2 to 2 hours, until it's just about doubled in bulk.

3) Gently deflate the dough, and transfer it to a lightly greased work surface.

4) Roll and pat the dough into a rough rectangle approximately 12" x 16". Put 2 tablespoons melted butter in a small bowl, and add the paprika, if desired; it's there for color, and accentuates the buns' swirl, but omit it if you wish. Spread the dough with the melted butter.

5) Starting with a long side, roll the dough into a log.

6) Cut the log in 1" slices, using a sharp knife, or a piece of dental floss looped between your fingers.

7) Lightly grease two 8" or 9" round cake pans. Arrange 8 buns in each pan.

8) Cover the pans, and let the buns rise for 60 minutes, until they're noticeably puffy. Don't let these buns rise too long; you want them to have enough rising power left to expand nicely in the oven. Towards the end of the rising time, preheat the oven to 350°F.

9) Uncover the pans, and brush each bun with some of the remaining melted butter.

10) Bake the buns for 22 to 25 minutes; they'll color only slightly.

11) Remove the buns from the oven, and turn them out of the pan onto a rack. Brush with any remaining melted butter. Serve hot or warm. To reheat, place the buns on a baking sheet, tent lightly with aluminum foil, and bake for 10 minutes in a preheated 350°F oven.

12) Wrap any leftover buns airtight, and store at room temperature for several days. For longer storage, wrap airtight and freeze.

Yield: 16 buns.

Click here to see the King Arthur Blog entry about this recipe.

nutrition information
Serving Size: 1 bun (53g) Servings Per Batch: 16 Amount Per Serving: Calories: 160 Calories from Fat: 60 Total Fat: 7g Saturated Fat: 4.5g Trans Fat: 0g Cholesterol: 30mg Sodium: 190mg Total Carbohydrate: 20g Dietary Fiber: 1g Sugars: 1g Protein: 4g

* The nutrition information provided for this recipe is determined by the ESHA Genesis R&D software program. Substituting any ingredients may change the posted nutrition information.
reviews

Thursday, October 22, 2015

"Glow in the Gardens" and a Chicken Dijon Recipe

On Wednesday evening, Larr and I went to the "Glow in the Gardens" event at the Denver Botanic Gardens. I love lights and I love doing holiday things, so when I saw the poster for this event this past summer, I knew I wanted to go. I had originally had visions of a whole family excursion. I guess I was hoping for a sort of revival of the fall fun we had when the kids were little. But, that was not to be. I just have to let go of those ideas.

Anyhow, Larr and I tried to go last week, when the weather was perfect and it was a Hollywood movie kind of night. Lots of other people had those same visions, and so we could not even get a parking spot. Last night was supposed to be rainy, so it was much less crowded than it could have been.

We entered at dusk. The pumpkins were freshly carved and the decorations were lined up like little soldiers. I especially loved the spot where there was a heavy fog hanging in the air from the large water sculpture. I also loved the glowy balls hanging from white knee high hose. (I think that might be my favorite decoration at the event.)

Dotted around the decorated areas where people gathered you could find these man-made trees where you could send a wish to you dread relatives. It was a start to their Day of the Dead event that is coming up.


The reflections of the lights in the trees on the lake were also a bit magical. The event was pretty quiet and calm, which I loved. Larr and I were able to notice the lights reflected on the water, the warm color of the wood illuminated in the gazebo and the glow of the leaves that were lit up from behind.

And of course we saw pumpkins, lots of them. As you can see, dinosaurs were the theme of the evening.
----------
Chicken Dijon

4 skinless, boneless chicken breasts
3 tablespoons butter
2 tablespoons all-purpose flour

1 cup chicken broth
1/2 cup half-and-half cream
2 tablespoons Dijon-style prepared mustard

In a large skillet, brown chicken in butter/margarine for about 15 to 20 minutes or until cooked through and juices run clear. Remove from skillet and place on a warm oven-proof platter.
Preheat oven to 150 degrees F (65 degrees C).
Stir flour into skillet drippings. Add broth and deglaze skillet by stirring vigorously until flour is somewhat dissolved and liquid has the consistency of a sauce. Add cream. Simmer, stirring, over moderate heat for about 10 minutes until sauce is a little thick. Stir in mustard and heat through.
Pour mustard sauce over chicken breasts. Put platter in warm preheated oven for about 10 to 15 minutes, then serve!

Friday, October 16, 2015

Daily Musings Journal and Two Hands Paperie

I spent Thursday evening at Two Hands Paperie at an art event, the unvealing of the 2016 Daily Musings Journal. It was created by a friend of Mia's, Lee DeYoung. The journals we worked with are an outgrowth of the journals that she started making for herself about 6 years ago, when she was drawing each box by hand.


I like the fact that a whole week can fit on just two pages. The size of the boxes makes it seem less intimidating. It was fun to look through her journals and see how her style has evolved. It has gone from handmade boxes filled with light handwritten entries, to colorful, fun entries.

Lee was very generous and shared copies of a few pages for us to play with. I opted to buy journal and begin adding light decorations to it as I am going to give it as a gift. I am adding lines of fun washi tape to the top of each page. I might gather stickers or other fun add-ons to make it into a little kit.

It was fun talking with Lee. This is a journey in her life that she had not expected to take and I think those can be some of the very best journeys. She started out selling to just a few friends. They showed their journals to others, some of whom also bought the journal.
She also hosted the "Daring Doodlers" challenge recently, which received more than 400 entries. You can also see what Lee is up to on her blog. Today she is headed to Chicago to do the same kind of event there. I am excited for Lee and I hope her success continues to grow!

Monday, October 12, 2015

Sunlight, Paper, Ink, Wax and Inspiration + Cabbage Rolls Recipe

This fall is one of the most glorious ones that I can remember. I don't know if that is because it is in fact one of the most beautiful falls, or if I am just making a point to notice. Fall weather in Colorado can be bipolar. The year that Ethan was born, on Labor day in the very start of September, it snowed as we were bringing him home. I remember because I did not have the right clothes for him. In the past we would have already had some serious snow, but not so far this year, and I don't know when it will come. Other years, the first snow of any significance was on Halloween.

Either way, I made sure to get out in the fall air and enjoy the warmth of the sun on my skin, especially on my face.

On Saturday I went seeking artistic inspiration. I was a bit stuck on how to begin the castle that I must build in a few short weeks, so I thought talking to other artist might help.

My first stop was at the 
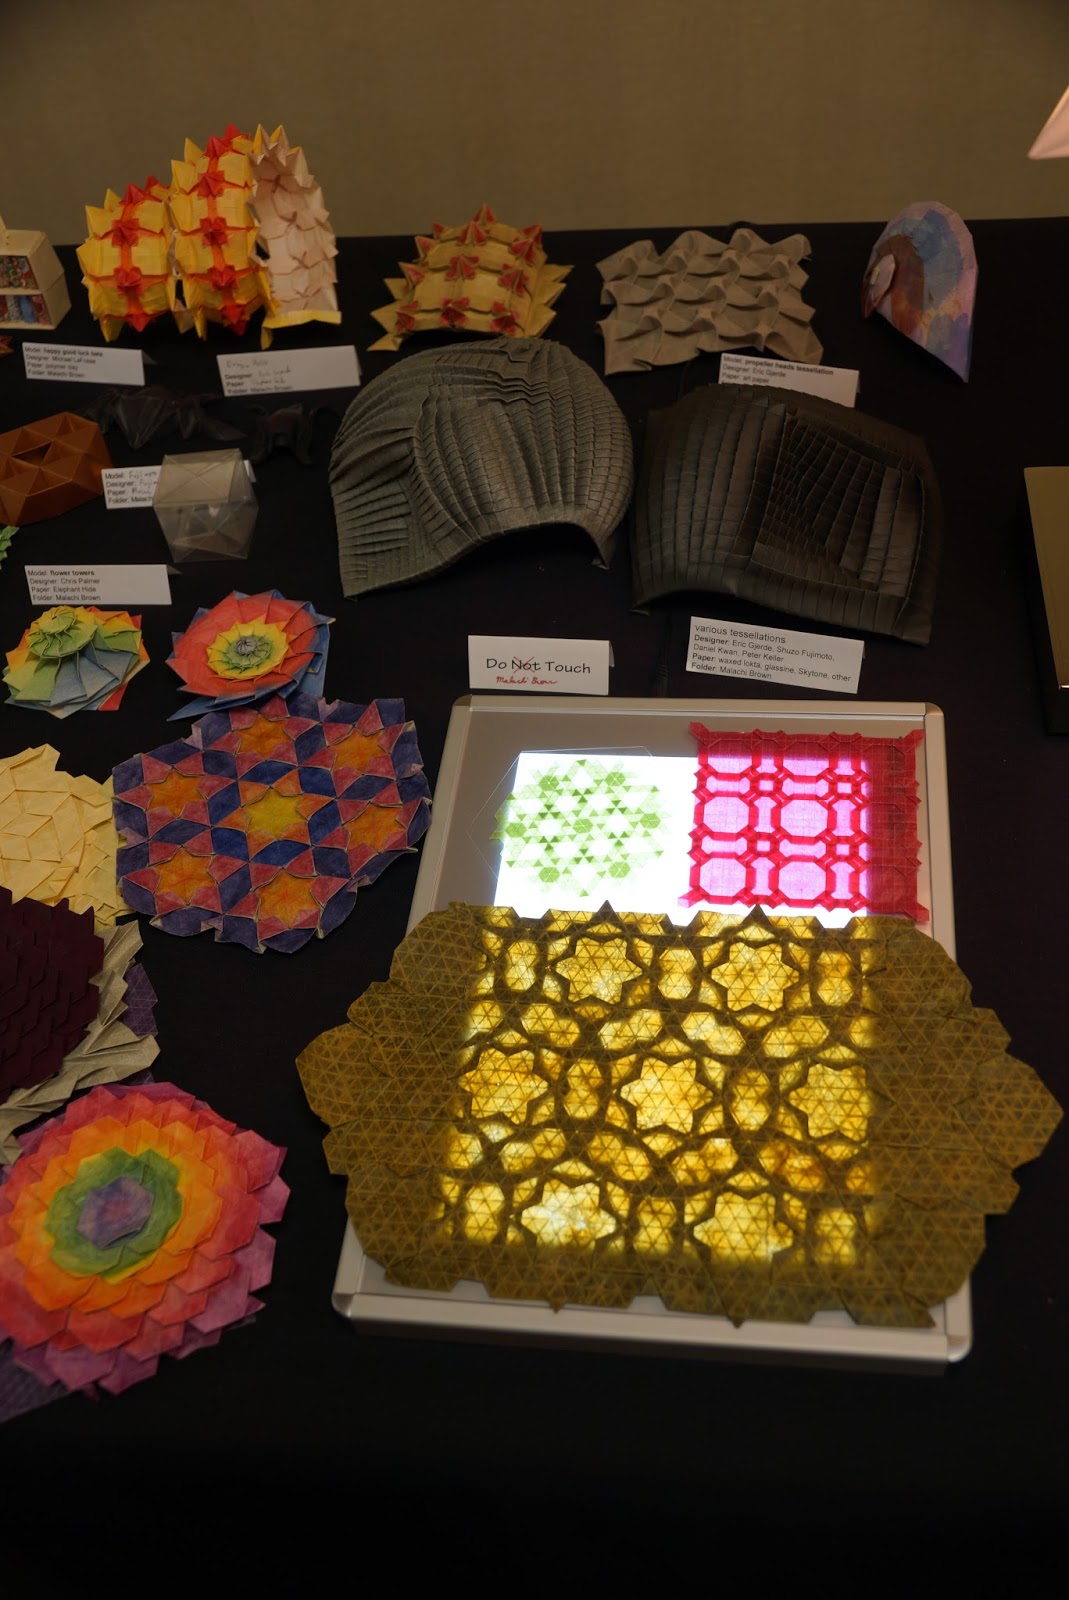
Pacific Coast Origami conference, which was in a hotel in Boulder. The portions of the public exhibit and vendors was very small, but interesting and the people were very welcoming. I took a number of photos to show my students who like to give a go at origami

From there I set off to visit as may studios as I could fit in a day. It was the final day of the Boulder Open Studio event which takes place during the first two weekends of October. I have been before, but it had been years. I wanted to talk to other artists, I wanted to see what they were creating and I wanted to see how they organized their spaces. I had expected to be dazzled by a host of spacious rooms with great ventilation and windows or plexiglass garage doors that allowed the sun to stream in. I was surprised to find that many of the studios were in tiny, often dark, rented spaces. Each artist made his/her space very personalized and many of the spaces were inspiring, but I also went home feeling like the cozy set up that I have in a what used to be a spare bedroom, quite sufficient.

My favorite part was talking to the artists.

I first encountered 
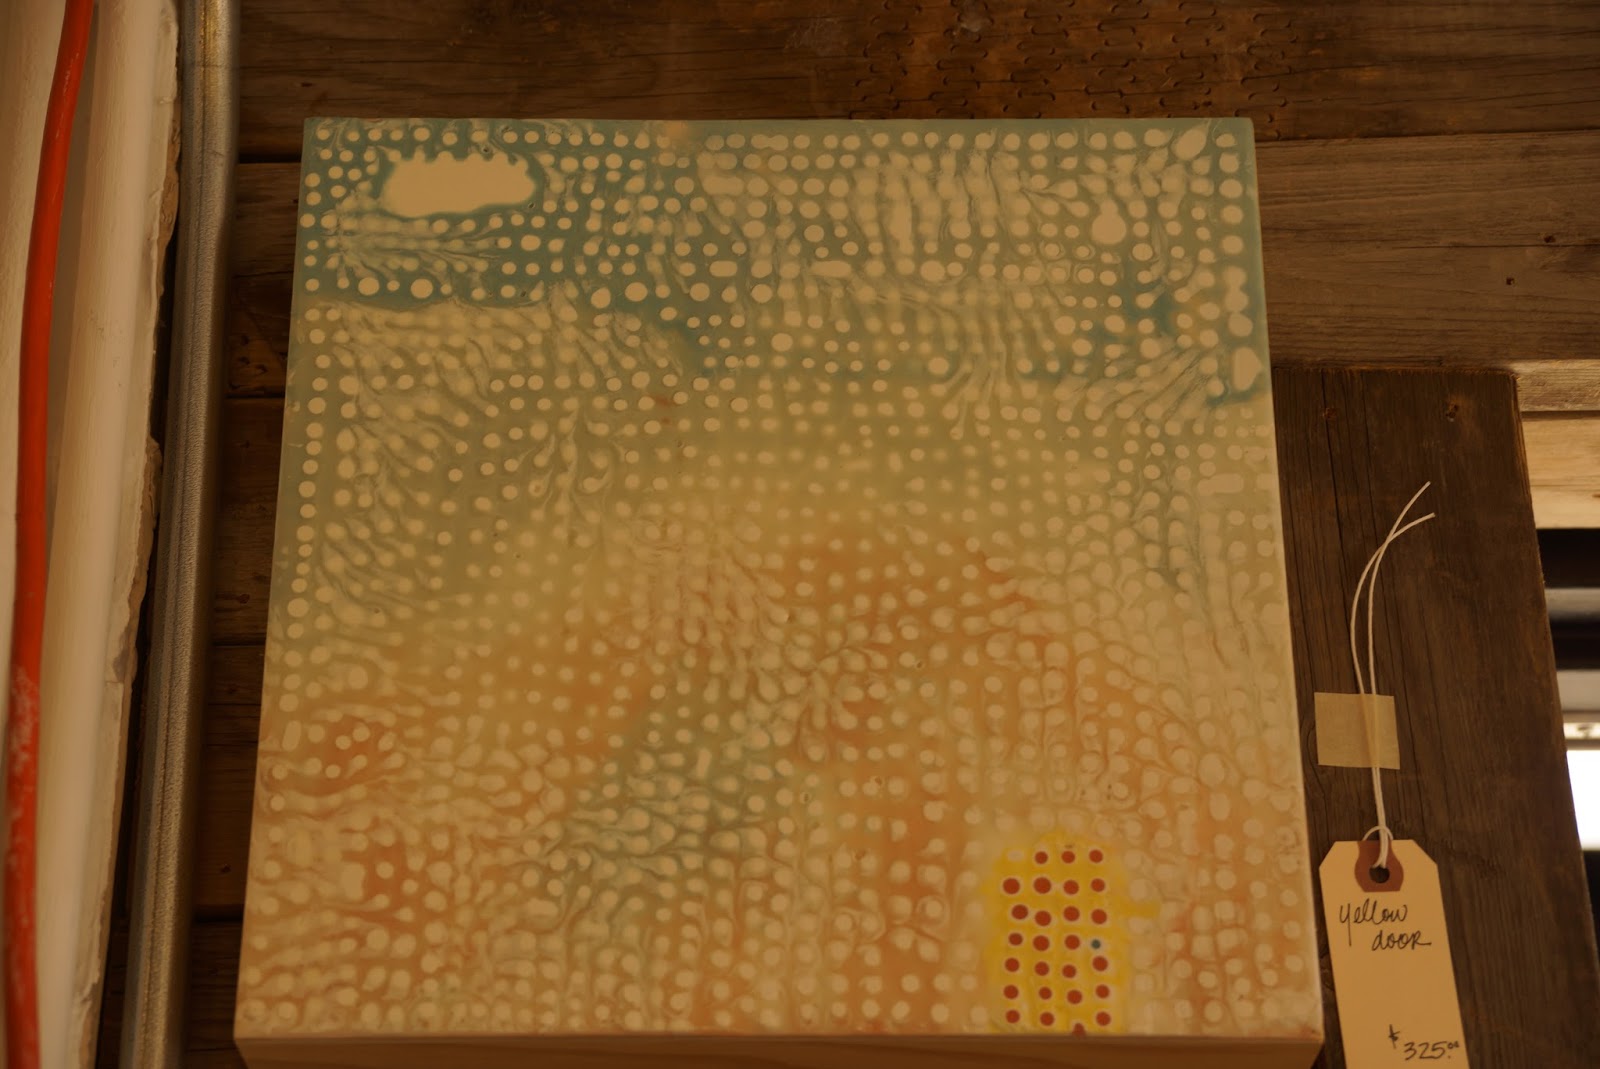
Susan Douglass who is a retired geologist. She creates very moving sculptures from her retired vellium maps from places she has been to. The shapes of her sculptures imitate some natural feature, whether that be weather, rocks, water, etc. I loved how close I could get to them. She also does a series of painting about weather. The one I have below I think is an interpretation of snow.

Liz Quan has a studio next to Susan. Liz creates exquisite porcelain sculptures. Her studio and art made me wish that I had the patience to work with that stubborn clay. I could imagine myself sitting in the sun streaming from the window in her studio carving away at the beginnings of small clay pieces. Then I remembered that porcelain and I do not get along very well, so I settled back into admiring her work.

Next up, I stopped in to see Alix Christian's studio. I know her from Two Hands and I wanted to see her space. It was my favorite studio of all. The previous tenants were leather workers. They lined some of the walls with old, worn wood and Alix's husband made wonderful, shallow shelves to hold her framed pieces.

Alix's talent style has many different styles. I was very inspired by her kid-like pieces. I may create some art like hers with art my children made when they were young. Alix is very positive and inspiring. I hope to be able to take part in one of her open studios some day. It is a bit of a challenge for me since they take place on week days.

I also stopped by a shared printing studio and encountered a few artists that I know from going to Anderson Ranch. It was nice to have a chance to chat with them.

I was also very smitten with the art of printer, Theresa Haberkorn. I am very interested in trying out wood block carved prints. I love the personality in these pieces, especially the piglet pieces. She gave me permission to show the printing blocks and the prints.

Phil Lewis had the most beautiful, gallery like space and lots of interesting art. I enjoyed learning about how his artistic processes have evolved over the years. He was kind enough to allow me to show you in the photos below.

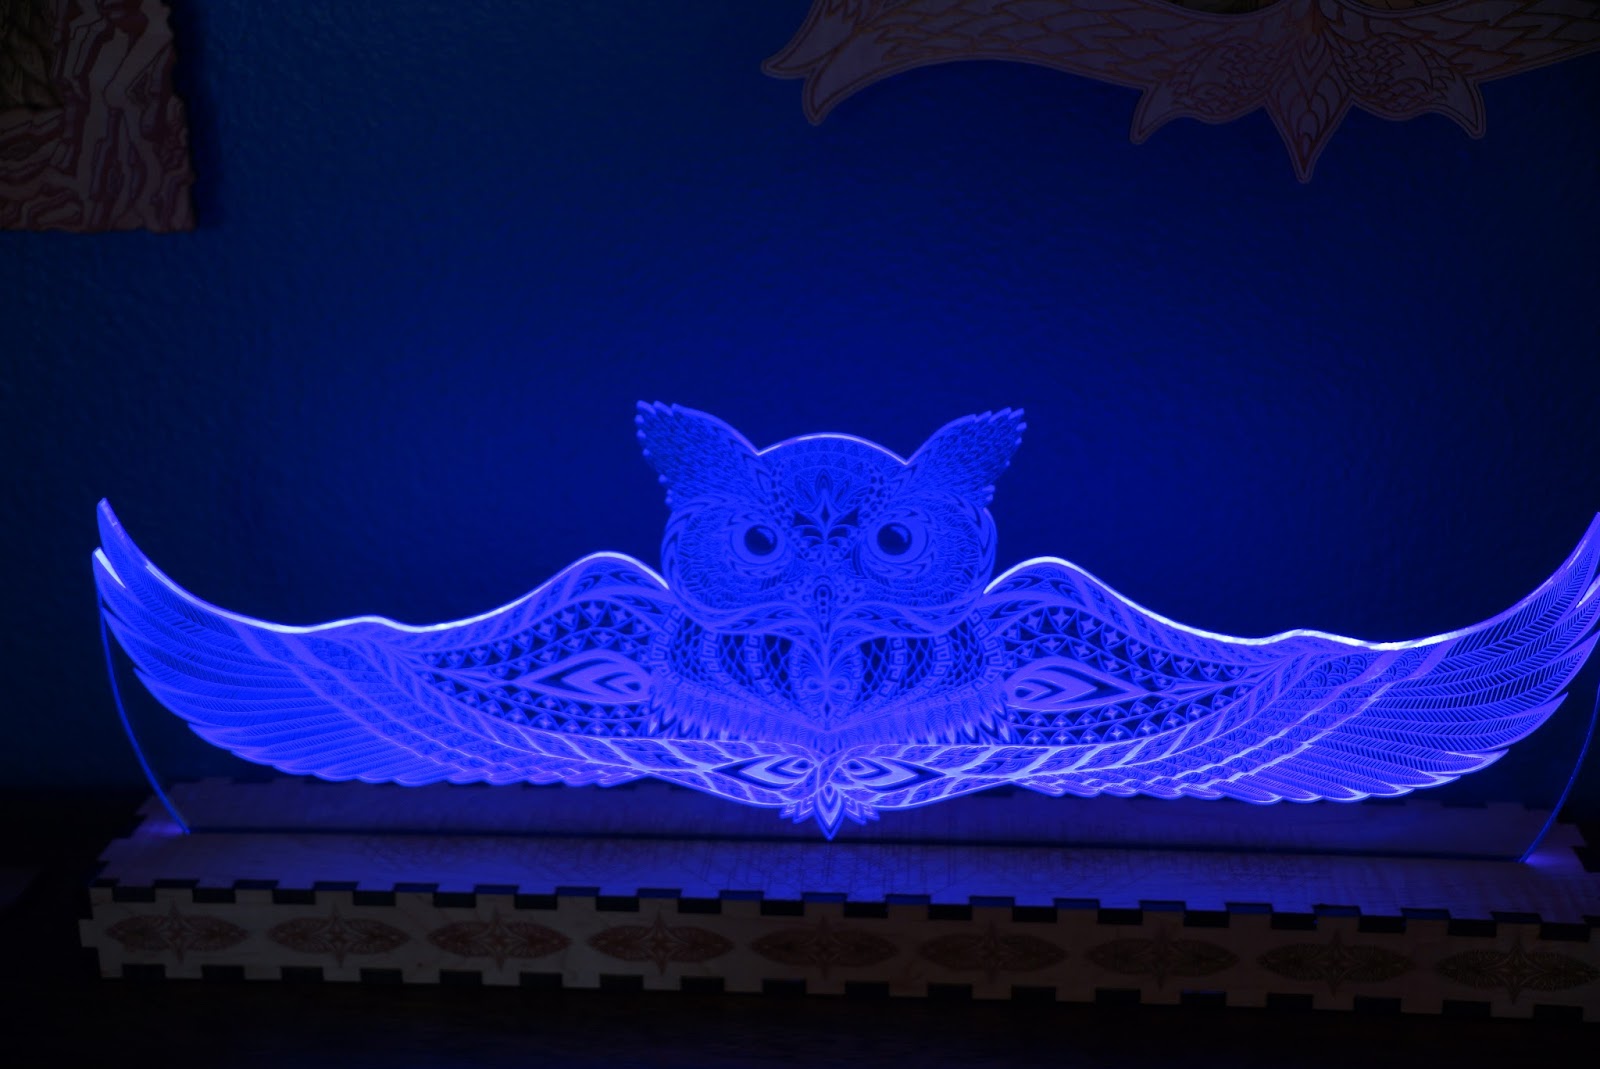
I picked my way through a intentionally created community to see the artwork of Lee Heekin. I would have liked to talk with her about her art, but she was not there. I am very intrigued by the encaustics that she creates. It appears that she makes the boxes and does a multi-layer wax pour. After it is cooled and set, she afixes a lightbulb into the back of the box. The idea is very thrilling to me.

The best surprise of the day came from meeting Molly Hargarten. She and I like so many of the same kinds of things and have such similar artistic interests that I could imagine that we might become friends. We talked about artistic processes and realizations that we have both made. I even asked her if she would like to get together and make art some time. She had many wonderful pieces, but the red-winged blackbirds were my favorite, hands down. After leaving her studio, I was so uplifted that I decided that was a good place to end my self-guided tour. There were at least 150 more studios I could have visited, but I was satisfied and ready to head home.


-----------------------
Cabbage Rolls

2 pound lean ground beef
1 large Red Onion, chopped
4 cloves garlic
2 pounds cabbage, chopped into bite size pieces (I use about 1/2 a med. head of cabbage, the weight is approximate)
2 tablespoons olive oil
4 cloves garlic, minced
1 can Tomatoes, Fire Roasted, Chopped (about 14 oz.)
¼ cup chopped parsley
1-2 TB Basil, dried
2 tablespoons lemon juice
½ teaspoon black pepper
Salt to taste
2 cup cooked rice
1 large pizza dough, or bread dough

Pre-heat oven to 425 degrees.

Heat a pan on medium heat and add ground beef until cooked. Drain off the fat. Remove and place in a bowl.
To the skillet add onions, garlic and olive oil and cook stirring for 5 minutes. Add in the cabbage and cook longer, until the cabbage begins to wilt. Add in tomatoes, parsley, basil, lemon juice, salt & pepper (if using) and stir well. Finally add cooked rice and the cooked ground beef.Stir well to mix.

Divide the dough into balls about the size of a racket ball. Roll each one out on a floured board. Place about 1/4 cup of the cabbage mixture in the center of the dough. Fold the dough over to make a pocket. Place seam side down on a cookie sheet lined with parchment paper or non-stick foil. Repeat until they are all constructed. Bake for about 25 minutes, or until golden brown. Brush the hot rolls with butter right after removing them from the oven.

These travel well. Sometimes I add a bit of Worchestershire sauce to the mix if it needs a bit of kick.