Showing posts with label altered art. Show all posts

Sunday, April 12, 2015

More Altered Book Art from Two Hands Paperie

Last Wednesday I went up to Two Hands Paperie, my favorite art store, to spend time with other artists working on our submissions for the call for altered book art. I didn't want to leave anything to chance, so I actually finished my piece before I went to the work night. I spent the evening admiring the art made by the others, teaching people a few helpful techniques and starting another altered book, which I may or may not actually finish.

It was really fun to see what Jennifer Ghormley did with the colored cones that a bunch of us help make at the community art making night about a month ago.

It was really something to view and think about. Jennifer printed the colored portions during one of the snow storms we had in January.
We helped make the forms at a Two Hands Community Art event. (Fun, Fun, Fun) and then I get to see this. I think about all of the measuring and ladder work it took to install it. It took her two days to put it all up. I am impressed by her art.

I also took photos of the submissions for the altered book exhibit and contest. I thought you might like to see those, too.
This is "Sea Foam." It is made by Jeane. She told a great story about making her piece. I loved the part about her going to Whole Foods to by a Red Snapper, then taking it home to prepare the bones for her sculpture. It took her weeks. She even referenced video instructions by an 11 year old boy who is a sort of bone preserving expert. I loved watching her talk about her creation.

I did not get to meet any of the other artists, but I did get to see their art.

It is exciting to anticipate what might be the next art making event.

Thursday, April 09, 2015

Tall Ship and Lighthouse - Altered Book Sculpture + Cheese Enchilada (Quick) Recipe

I have finally finished the piece that I created for the Altered Book contest and display over at Two Hands Paperie. I had such fun making it. I had never created a book sculpture before, but I have a long history of making small scale replicas out of paper. Making the lighthouse and the ship were pretty easy. Creating the water, now that was a challenge. I loved doing it all.
Ethan worked a bit with me to make sure that the ropes on my tiny ship were in the correct places, even though I do not have as many ropes as a real ship would have. He said that he would post a picture of this on his Facebook page and that his shipmate friends, especially the boatswains, would really like it. Thus, we had to make it as realistic as was reasonable to do so. We had detailed discussions about wind direction and how the sails would respond. We talked about the water and the waves. Creating those was the most challenging part as I have not spent enough time on a boat to visualize it very well. My first attempt at waves ended up looking more like flames. When I searched for inspiration, I found that other artists struggled with the water, too. Some of them simply ignored it. Others dealt with the water in the sculpture in a way that was too patterned and regular for what I wanted mine to look like. In the end I used torn pieces of paper that I curled with a hot curling iron. It was really wonderful getting a chance to work with Ethan like that. I would like to find more ways to do collaborative art with my kids.

I also love adding light to the sculpture. I used a tiny set of LED lights to accomplish this.
I carved out hidden channels to thread the copper wires between the edge of the book. the lighthouse and the boat. Lighting up the scene gives me a little thrill.

Ellie, my faithful encourager and avid photographer took great pictures of my piece before I delivered it. Kohlton says that this piece is his favorite piece of art that I have created, so far.
On my way to Two Hands, I stopped by Nick-n-Willie's pizza to pick up a slice of pizza. The college aged employees loved my art and took photos of it. I encouraged them to give it a try, if they like making fiddely, precise things, which I enjoy.

I spent the evening at Two Hands at a work session. I made other things since my book sculpture was done. In my next posting I will share photos of the other entries.

-----
Tonight I might make cheese enchiladas.

Cheese Enchiladas
via: Herdez

2 tablespoons canola oil
4 corn tortillas
1 cup Mexican cheese blend
(Sauteed Red Onions)
1 cup HERDEZ® Salsa Verde

For Garnish:
HERDEZ® Jalapeño Chiles
Cilantro

1. Heat oven to 350°F. Grease 9x13­inch baking pan with canola cooking spray.
2. In medium­large pan, heat 4 corn tortillas. When finished, lay them on top of each other to
keep them soft and heated.
3. Add 2 tablespoons cheese to one end of tortilla; roll and place seam side down in baking
dish. Repeat with remaining tortillas and cheese.
4. Pour HERDEZ® Salsa Verde on top of enchiladas covering completely. Sprinkle remaining
cheese on top of enchiladas.
5. Bake 10 minutes. Garnish with jalapeño slices and cilantro.


Monday, April 06, 2015

Of Lighthouses, Tiny Ships and Good Food (Scalloped Potatoes, Pasta Bolognese & Guajillo-Braised Beef Short Rib Taco)

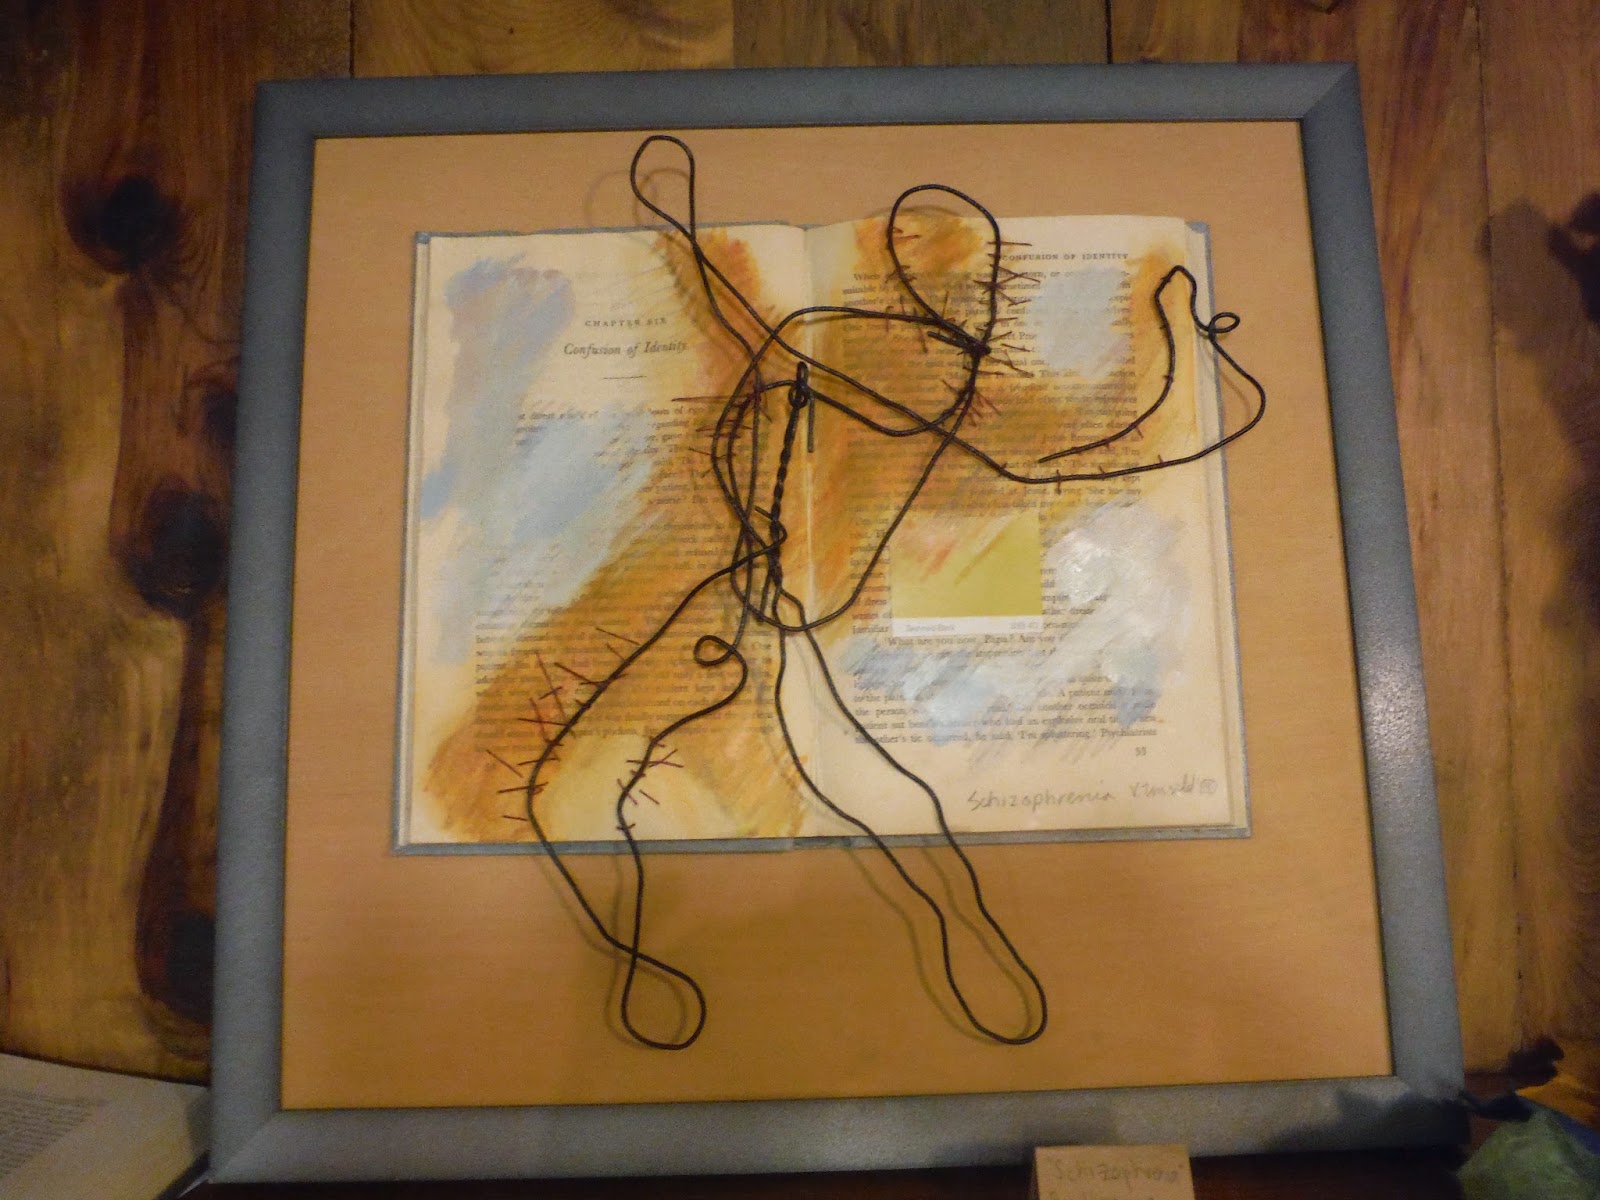
This past Saturday I spent the day buried in my art. This time, instead of encaustics, I am creating a piece for an altered book display and contest. The art has to involve altering a book and the rest is up to you.

I settled on a ship related story; I choose Captain Courageous by R. Kipling. I am excited with how it is going so far. I am especially excited that I figured out how to make it light up. Oh how I love technology!

Here's what my desk looked like this evening:
I had hoped to finish it tonight, but the evening has gotten away from me. I was late coming home because a few kids at school were in need of someone to focus, listen and relate. They needed to feel heard and validated. That is one of the most important things I do, so the rest of the work was pushed off.

I need to finish it tomorrow as I am going to deliver it on Wednesday.

We spent Easter Sunday at a family party at my mother's house. Most of Kohlton's family that lives in town joined us. We closed up the evening at a party at the Cure homestead. It was a nice way to end the evening.
---
Here's what I made for Easter dinner:


Scalloped Potatoes
Via: Martha Stewart (and modified by me, of course)

3 pounds Yukon gold potatoes, peeled, and sliced paper thin (I used russet potatoes that I sliced with my food processor and that was just fine.)
1 small Onion (diced)
5 TBL flour
6 tablespoons Butter, diced
1/2 tea Pepper
1/2 tea Dry Mustard
1 tea Garlic Powder or 1 clove Garlic, minced
1 tea Paprika
1-2 TBL Parsley
1 tea Salt
pinch of Cayenne Pepper (omitted)
1 quart whole milk, or as needed (or 2 and 1/4 c milk)
1 cup heavy cream (I left this out as I do not like really rich food.)
5 ounces Gruyere cheese, grated (I probably used more than this amount.)
1/4 c Parmesan cheese

Preheat oven to 325 degrees with a rack set in the lower third of oven. Combine sliced potatoes and milk in a large saucepan over high heat. Bring to a boil, and immediately reduce heat to low; cover and simmer until potatoes are just tender.

Place a colander over a large bowl and drain potatoes, reserving milk. You should have 2 cups of thick, starchy milk. If potatoes have absorbed more than 1 cup of milk, add enough milk to bring the reserved milk volume to 2 cups.

In another sauce pan, melt the butter. Stir in the flour, garlic, dry mustard, paprika and salt. cook the roux a bit longer, turn off the heat just as the flour begins to brown (if you can tell that.) Pour the reserved milk into the pan and stir to combine and thicken.

Rub a 3 1/2-quart oval baking dish with garlic and butter. Arrange sliced potatoes in the baking dish; season with salt and pepper. Dot with remaining butter, some parsley and pour over reserved cooking milk (and cream). Do Sprinkle cheese over top. Do this for each layer, ending with cheese on the top.

Transfer baking dish to oven and bake until cheese becomes deep golden brown and milk has reduced and thickened, 80 to 90 minutes. Remove from oven and serve immediately.

-------
Here's what we had tonight. It was great, but I will most likely wait until the fall to make it again.

Nigel Slater's Really Good Spaghetti Bolognese
via: Food52

For the bolognese

4 tablespoons butter
3 ounces cubed pancetta
1 medium onion
2 fat cloves garlic
1 carrot
2 stalks celery
2 large, flat mushrooms such as portobello, about 4 ounces
2 bay leaves
1 pound ground beef or lamb
1 cup crushed tomatoes or passata
1/4 cup red wine
3/4 cup stock
1 nutmeg (just a few grinds, really)
3/4 cup half-and-half or cream
Spaghetti or tagliatelle for 4
Grated Parmesan

Melt the butter in a large, heavy-based pot -- then stir in the pancetta and let it cook for five minutes or so, without coloring much. Meanwhile peel and finely chop the onion and garlic and stir them into the pancetta. Peel and finely chop the carrot and celery and stir them in, too. Lastly, finely chop the mushrooms and add to the pan, then tuck in the bay leaves and leave to cook for ten minutes over a moderate heat, stirring frequently. Turn up the heat and tip in the meat, breaking it up well with a fork. Now leave to cook without stirring for a good three or four minutes, then, as the meat on the bottom is starting to brown, stir again, breaking up the meat where necessary, and leave to color. Mix in the tomatoes, red wine, stock, a grating of nutmeg and some salt and black pepper, letting it come to the boil. Turn the heat down so that everything barely bubbles. There should be movement, but one that is gentle, not quite a simmer. Partially cover the pan with a lid and leave the putter away for an hour to an hour and a half, stirring from time to time and checking the liquid levels. You don't want it to be dry. Pour in the half-and-half or cream a bit at a time, stir and continue cooking for twenty minutes. Check the seasoning, then serve with the pasta and grated Parmesan.

--------------
Guajillo-Braised Beef Short Rib Taco
Recipe adapted from "Tacolicious" by Sara Deseran, published on Tasting Table

Yield: 4 to 6 servings

Prep Time: 1 hour
Cook Time: 4 hours and 30 minutes
Total Time: 5 hours and 30 minutes

For the Guajillo-Braised Beef Short Ribs:

8 guajillo chiles, stemmed and seeded
3 dried chipotle chiles, stemmed and seeded
3 tablespoons canola oil
3 pounds boneless beef short ribs (see note above)
1 large yellow onion, roughly chopped
2 cloves garlic, roughly chopped
1 (12-ounce) bottle dark Mexican beer, preferably Negra Modelo
2 teaspoons ground cumin
1½ tablespoons Mexican oregano
½ cup water
Salt and pepper, to taste

For the Tacos:

Corn tortillas, warmed
Diced white onions, for garnish
Chopped cilantro, for garnish
Salsa of choice, to serve
Lime wedges, for garnish

1. Make the guajillo-braised beef short ribs: Preheat oven to 325. Toast the dried chiles on a sheet tray until fragrant, about 20 seconds. Remove and set them aside on a plate.

2. Heat the oil in a large Dutch oven over medium-high heat. Working in batches, sear the short ribs until deep golden brown on both sides, about 6 minutes. Add more oil to the pot to prevent any scorching. Remove the short ribs and set aside on a plate.

3. Adjust the heat to medium. Add the onions and cook, stirring often, until they begin to brown, about 5 minutes. Add the garlic and cook for an additional 2 minutes. Add the reserved chiles and beer and adjust the heat to low. Simmer, uncovered, stirring occasionally, until the chiles have softened, about 5 minutes.

4. Place the contents of the pot in a blender. Add the cumin, oregano, water and season with salt and pepper. Purée on high speed until smooth, adding more water if needed to thin out the chile mixture.

5. Return the meat to the pot and add the puréed chile mixture. Cover and transfer to the oven, and cook, stirring occasionally until the meet is fork-tender, about 3 to 4 hours.

6. Remove the meat from the oven. Using two large forks, shred the meat. Taste and adjust seasoning if needed.

7. Make the tacos: Serve the guajillo-braised beef shorts ribs over corn tortillas and top with onions, cilantro, salsa and lime.

Saturday, June 28, 2014

Tuesday - The Start of Creativity

(Griddle with a palette of wax colors.)
The last time I was at Anderson Ranch, I created portraits of each of the four of us. Each image featured a photo of the person, along with some other images, text and textures, that gave you an idea of that person's personality, or at least the kinds of things each person liked. This time I decided I would make a new set of portraits. I originally thought I would include much of the same kind of images, text, etc. However, I have decided to be really brave and push past my usual comfort zone, as well as forgo the usual kinds of things I use in my art. I am breaking out of my own imposed boundaries. I hope it goes well. My fingers are crossed. I have made each of our images black and white, then printed them on rice paper. I have attached them to a base that has 1 1/2" thick sides. I will decorate the backgrounds with colored wax and who knows what else.

On Tuesday, we began to get to the creative stuff. I was excited for this part since it would help give me an idea of what I could do with my images. In the world of encaustics, some of it is the art of altering photos and some of it is about painting or creating images with colored wax, transferred images, etc. I really have very little idea about how I wanted to treat the images I had mounted so far.
(Mia's Sample - Color overlay, graphic image transfer, script added by scratching/gouging and filling in with oil stick color, gouging and filling with colored wax)

On Monday we dealt with super smooth Epson paper that created very crisp, clear and saturated images - just the kind of thing I love. I printed up a photo Ellie took from the local amusement park, and photos of Ellie, as well as Ethan, painted for Day of the dead. On Tuesday, we began printing on a specially prepared rice paper. The images are warming, softer, a very different look.
(An unaltered image of Ethan that I created using techniques in Photoshop.)

The first stage is to prep the cradle (wooden frame or box (often with thick edges, such as 1 1/2", piece of wood, etc.) by taping the edges with painter's tape and painting the main surface with regular gesso if you are going to use an image (so that the color of the wood does not show through) or with encaustic gesso if you are going to paint a picture with the wax and no base image. Using regular gesso will not allow the wax to adhere well enough. Then, if you are using a photo or image, you need to glue it to the substrate (the frame/box). This is done by applying a very thin layer of Noro paste to the back of the image, letting it dry, and trimming it a bit later. If you are using rice or mulberry paper it needs to dry for at least a half day.
Next, you prepare the main surface by painting on a layer of medium which is composed of 8 parts bees wax and 1 part Damar resin. You start this process by making sure your piece is level. In our case, we used small levels and old pieces of matt board to achieve this.
After you apply the medium you let it cool and then fuse it using heat from a heat gun or a torch. (Using the torch the first couple of times was a bit scary. Mia promised that after you've used it about ten times, you will become comfortable with it; she was right.)

We learned about several ways to transfer images and then we set to work. Mia had more wonderful and inspiring samples of what we could do.


I love the bits of color at the edges of the Jesus and Barbed Wire Heart pieces you see above so that is what I went for.

I used my lino cutting tool to gouge random lines in the base medium, painted wax color on top of those marks and fused them. I did several layers of this process.

Then I took a clay working tool and removed the excess on the surface.

It was interesting to see the way various people use their time. Some folks prepped every base they were given, purchased more and prepped those, too. Then they began finding images. Some people prepped a few surfaces, picked, printed and mounted images and then started the whole process over again. A few of us prepped, printed and began altering just a few pieces. That is what I opted to do. I wanted to get my hands into the creative stuff. By the end of the night (which was about midnight - I want to make sure I get as much done as I can humanly do) I was feeling like I was lagging behind. I still have so many prints that I could make, and I have not even picked the images yet. I want to make sure that I get that done soon.

Wednesday, January 27, 2010

How about a Bit of Artsy Inspiration? Plus, a Little Recipe

I love a good, artsy movie. Usually they are a little obscure and demand your full attention. When my husband calls me up and says, "We should see this today." I make sure to pay attention. Last night was such the case. We went to see "The Imaginarium of Doctor Parnassas"


Here's a wonderful example of the power of cut paper animation. It is by Andersen M Studio for the New Zealand Book Council:

How about another one they made for Nokia?


This evening we are getting ready to have a few friends over to do a bit of light Valentine crafting. Here's a great project that I found at the Artful Crafter:

We're going to make a few of those and have a nice potluck dinner. In trying to keep with their food allergies I made a variation on Kheer with Almonds for dessert.

Kheer with Almonds

3-4 cups Milk (you may replace 1-2 cups of the milk with water, if you like)
1 cup Basamati Rice,cooked
1 cup Sweetened Condensed Milk (You may replace this with Coconut milk, if you like)
1/2 cup Sugar
3 TBL. Raisins
3 TBL. Almonds
3 TBL. Pistachios (I didn't have any of these)
1 tea. Cardamon, powdered
(1/4 tea Almond Extract)

In a medium pan warm up the milk and add in the rice. Stir often to prevent burning. Slowly incorporate the sweetened condensed milk and/or coconut milk. Next, add in the sugar. Follow this with the raisins and the nuts. Taste it for flavor. My son wanted more almond flavor so I added a wee bit of almond extract. You can serve this as a drink warm or cold. I cooked it longer to allow it to thicken slightly. You may also increase the amounts of rice, raisin and nuts to meet your taste. Garnish with cinnamon and a few nuts placed decoratively on top.

Thursday, September 27, 2007

Chicken Enchilada Casserole & Emily Assemblage


I am trying out a new camera. I am not sure if I will keep it, but it does look promising. It is a Kodak EasyShare. I selected it because it has a 12x optical zoom, a sports setting ( = ability to take successive photos quickly) and it was in my price range. Since it was on sale it was $200. I will also try out a fancy camera that our coach bought on one of his trips to Tokyo. It was $400 US last year. It has a lot of fun features, but it is only the size of a cell phone and I am not sure I will be able to manipulate everything on it the way I would need to at a race. Also, it is not sold in the US, which means I could not get it serviced. I will give them both a try and see what I think.
So, the photo here is a gift I made for our friend Emily upon her 11th birthday. It was a lot of fun to make, but much harder than I expected. I put a cloth dress on her. Getting that to look right was a challenge. Also, making the flowers stand up was a bit hard. I hope she likes it. When looking for inspiration I learned that this kind of thing is an assemblage, and not a multimedia collage (as I had thought). Figuring out the right term was a bit tricky, too.
We are hosting a dinner party on Saturday evening for the people my husband climbs with. One person, Suzanne, will be returning to the South Pole some time next week. We will miss her until next summer. Here's what I am making. It is hardy and popular. You can make it ahead of time and enjoy the party while it cooks. When it is compiled it weights a lot.
Chicken Enchilada Casserole For a 13" x9" pan
12 corn tortillas
2-3 pounds of chicken (cut into chunks)
2 pounds Cheddar, Colby or CoJack cheese, shredded
1 large can Stoke's Green Chili w/ Pork
1 small can Mild Enchilada Sauce (red, mild)
1 small can Medium Enchilada Sauce (can the size of soup cans)
1 can diced Green Chilies (small can)
1 small-medium Onion, chopped
1-2 Garlic Cloves, mashed
2 cups Sour Cream (or 1 small container)
1 small can Jalapenos, diced (optional)
Preheat the oven to 350 degrees. Grease a 9"x13" pan.
Saute the chicken with a little salt, the onion, green chilies and garlic. You can add a small bit of olive oil, if you like. Cook until the chicken is done and the onion is limp.
Mix the Stoke's green chili sauce with the enchilada sauces and heat.
To prepare the casserole by assembling the layers as such:
3 corn tortillas spread along the bottom
Chicken mix
scoop or so of sauce
bunch of cheese
repeat this two more times.
Top with 3 corn tortillas
Sauce
Cheese
Place the completed casserole on a cookie sheet or something else to protect from bubbly overflow.
Cool for 15 min. before serving. Offer the sour cream and the jalapenos on the side for those what want them.
Enjoy - it is a big hit at our parties.
Bake until bubbly.

Monday, April 16, 2007

Penny's Gift for Operation Haremail


Art has a way of having a life of its own. You'd think that you were in charge, but often, you are not. The results take you in directions and places you never expected. Such is the case with this box that I made for Penny. I love how it came out, but it is not at all what I had planned. I had imagined something that was a lime green with a garden scene and some fun words, all done in very spring like, sherbert like colors. The green I created has a different hue and personality to it, so it was more fallish in tone. But, I still really like how it came out. On the front it says, "Inspire" using letters I cut out using my Cricut machine and the Printing Press cartridge. I also made her a hand carved rubber stamp of a jumping rabbit. This was inspired by some scrapbooking paper from a Japanese company. I also made a cover for a post-it note pad using paper that matches the box. My friend Peg sent one to me and I enjoy it, so I thought that Penny might like one, too. The other items were store bought goodies - little containers of glitter and confetti, bunny socks, a stuffed bunny, a card and a candy bar which did not make it into the photo because I picked it up on my way to the post office.

Sunday, March 25, 2007

A Book for Yvette and Nearly a Road Trip


I recently took part in the 5x7 Art Swap. The goal was simple, send your partner a piece of art that can fit into a 5x7ish size envelope. I sent to Yvette, an art student in England. Since she is into handmade books, I made a small one for her. This style is called a "star book." If you look at the pictures here, you can kind of see why it is called that. When you open it fully and tie it closed, it makes a star. It is super easy to make. You simply need to be very careful to get your folds neat and measured nicely. The actual book is fairly small, about a 3.5" square.
This weekend I am not having much time for creativity as we are packing and getting ready for our road trip to Santa Fe, New Mexico. The dog is off the the grandparent's home for a doggie get-petted-all-day-never-have-to-be-alone holiday. This makes her tail wag happily. The rats are off the have adventures at a friend's home and grandma Gay will take care of Chesterfield, our lovey, albeit demented and brain damaged, cat. I will not be posting for this next week as we are going computer free for the trip.
I promise to return with great pic.s. Happy Early Spring!

Sunday, January 14, 2007

Valentine's Day Mail Boxes - Altered Box Tutorial

As a kid, I loved the shoesboxes that we would decorate for the Valentine's Day party. Before we had kids I would make a very elaborate card for my dear husband. Now that we have kids I am back into making them. Last year I got pencil boxes and altered them. This year I found really cute mailboxes at Target. I only bought three. I got white because it would allow me to color them. I had so much fun doing them that Ethan and I went out in -5 degree weather to get more, and the store was all out of them. Ellie thought these were nice, but wished I would have gotten her a red one. Ethan says it would be okay if I made him one, but he would not show his friend! Either way , I am going to go on the hunt for more!

As I said, they all started out white. I used the Alcohol Inks put out my Tim Holtz to add color to them. The photos here do not do them justice. To do this, you will need a pair of disposible rubber gloves, a make-up sponge (the ones that look like triangles) or a good bit of gauze, the alcohol ink and the metal item. Open the ink and drip the color onto one part. For example, I put it on the edges near the door of the mailbox first. Then use the sponge/gauze to move the color around. You can get lots of different effects. I smear the color around to get it all covered, then I go back and dap. Be aware that it will dry pretty quickly. You cannot answer the phone or go to the bathroom and expect to be able to manipulate it. Also, you can add more color. Once it starts to dry it becomes a bit tacky for a short while. For this reason. I put it on wax paper, or balance it on a cup. If it is on paper, it may stick to it. I do this after I have colored all the parts that are to be colored. There are more ways to add more colors or effects, but those will wait for another posting.

Next I pick out the papers I want to use and I measure the areas where they will go. Once I have them cut out I try them out where I want them. Trying to trim paper with glue on it is not fun. Once it is correct, I glue them on. I usually use spray glue by 3M. This time I tried out the UHU Scrapbookers Pen. It worked great for most parts. I will give it a full review in another post.

Once the paper is applied I started to embellish them. I got a bit carried away, but I had so much fun doing it that I did not want to stop. I tried the UHU glue on the silk flowers, but it did not work so they are attached with glue dots, as are the sequins. The big flowers have two layers seperated by two glue dots to add dimension. The fun centers on some of the flowers are rhinestone bling, on others they are sequins (like the black and pink polkadotted one here.) I had to have some restraint on the side where the flag does down since it is flush with the box.

Some of the flowers are from "Got Flowers?," others are from Heidi Swapp and Lil' Davis. Still others are from a silk hydrangea stem I got at the craft store. The green leaves are harvested from an antique hat that is falling apart.

I also attached ribbon and rickrack. I usually run those through my xyron to make them adhere. This time I used the UHU Scrapbooker's Pen and it worked really well. What I like about the pen is that it has a flat edge where the clear glue comes out. This smears the glue as it comes out and reduces that spooge effect you get when you flatten a thick line of glue this helps you anticipate where it will spread to more easily.

I hope this is useful. If you have questions, email me or leave a comment.

I use this same technique on the lunch boxes I alter. If you search my archives, you will find lots of them.

Now, on to Valentine's Day cards...


Friday, November 03, 2006

Altered Boxes - Natalie's Other Side


This is the flip side of the box I made for Natalie. This side has less added rhinestone bling because I wanted it to lay nicely.